ISSUES
Security and privacy are very important, especially for those who store important data on a computer.
It is very important to prevent data leakage, for example, in the event of a laptop theft, since the operation to eliminate such an “incident” can be tens of times more expensive than the cost of even the most sophisticated laptop. (This is especially true for DevOps engineers.)
And in general, for an IT specialist, having an encrypted disk is simply a sign of professionalism - for example, like a neat appearance for a bank employee.
INTRODUCTION
This article is for those who want to set up disk encryption using LUKS technology on their computer (running Ubuntu 22.04). Here are instructions for setting up (in the “Instructions” section), excerpts from articles for those who want to understand the problem more deeply (in the “Reference Information” section), as well as some useful articles (in the “Sources” section).
If you like to understand what is described in the instructions before starting to do tasks step by step, then we have compiled a brief description of the instructions for you:
- We divide the physical disk into logical parts (partitions, volumes).
- We create encrypted partitions using virtual volumes.
- We install the operating system.
- Setting up the operating system.
Brief description of the technology (can be skipped)
A physical disk can be divided into logical parts (partitions, volumes) for ease of use. For example, on one partition of the disk we store all the information about the system, files for loading the operating system, on another - user information (photos, contacts, important information), on the third - games and movies. In order to take advantage of these technologies, we need to “partition” our disk into these partitions at the stage of installing the operating system (this can be done on an already installed system; we will consider the option of installing the operating system only).
As mentioned earlier, information about loading the operating system will be stored on one of our partitions. Our device through which we use the disk must recognize the partition on which the operating system is stored in order to start it after turning it on, and also recognize the remaining partitions so that the OS can write data to them.
Partition tables are used to enter data about partitions. There are two disk partitioning structures: MBR and GPT. MBR (Master Boot Record) and GPT (GUID Partition Table) are two different ways of storing disk partition information. Brief information about these structures can be found in the “Reference Information” section. After partitioning the disk, we need to determine which partitions need to be encrypted, i.e. on which sections information that is important to us will be stored in the future.
The Linux operating system supports several cryptographic methods to protect partitions, individual directories, or the entire hard drive. All data in any of these methods is automatically encrypted and decrypted on the fly. This article will look at disk encryption using LUKS technology, a brief overview of which can be found in the “Reference Information” section when installing the UBUNTU22.04 OS.
Please note that the data from the disk will be formatted using this installation method, so we recommend moving it to a more secure location.
INSTRUCTIONS FOR DISK ENCRYPTION ON UBUNTU 22.04
In order to start installing the OS on the device, we need an image of this OS on a portable storage medium (USB drive, DVD, etc.). How to make a bootable USB drive with Ubuntu OS, see the link in the "Sources" section.
CREATION OF SECTIONS
As mentioned earlier, we need to logically divide the disk (we call it /dev/sda) into partitions (volumes). In our case, there will be two main volumes: the volume for loading the operating system and the partition that we will encrypt.
To get started, we need to boot the UBUNTU22.04 installation from a USB drive. The installation is different on different devices, so see how to do this specifically on your device.
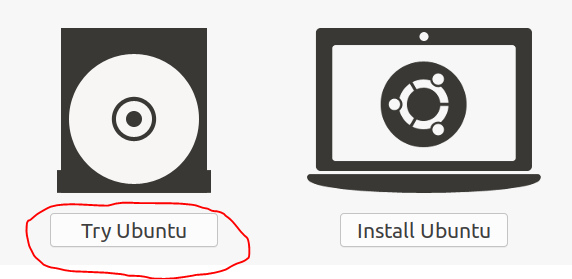
So, let's begin. We load our UBUNTU22.04 image from the USB drive. The files will begin unpacking, after which a window will appear on the screen, as in the image below. We need to select “Try Ubuntu” or “Try Ubuntu”.
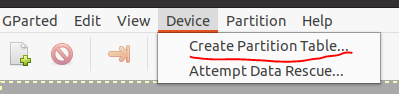
After this, you need to go to the terminal (CTRL+ALT+T) and, to open the partition editor, enter the gparted command and confirm by pressing ENTER. After this, the section editor should open. Here we need to create a new table and partitions in it. We create the table as follows: Device->Create Partition Table.
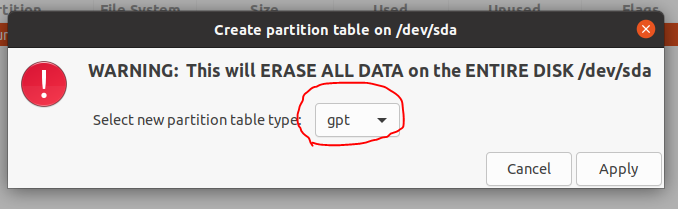
Next, we need to select the type of partition structure. In this example, we select GPT, because This uses a computer with UEFI firmware.
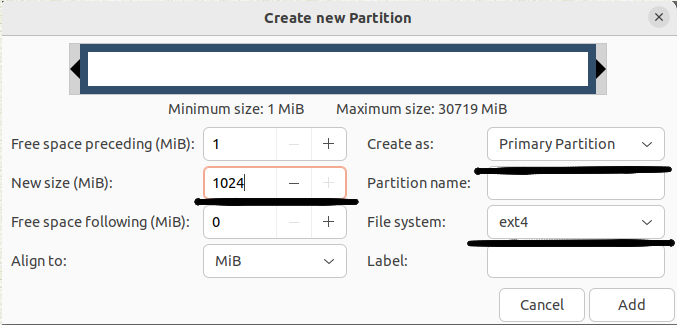
Based on the purpose of this article, we need to create two sections. The first partition should be several hundred megabytes in size (from 300 to 1000 MB) and formatted in the ext4 file system (for information about file systems, see the “Reference” section), it will be unencrypted and mounted in /boot (in the screenshot /dev/ sda1 at the end of the current paragraph). This will be the OS boot section, which contains the GRUB boot loader configuration files, Linux kernel images, initrd files that are necessary for the boot process.
The example below shows the creation of the first primary partition with a size of 1024 MB and an ext4 file system.
The example below shows the creation of a second primary partition with a size of 1024 MB and a fat32 file system.

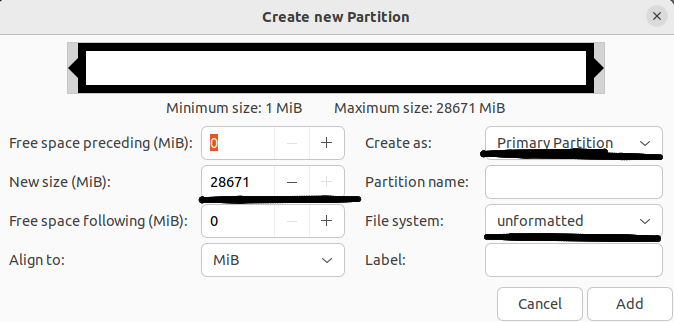
The third main partition (/dev/sda3 in the screenshot at the end of the current step in the instructions) will be encrypted and have a fairly large size.
This example assigns all free space to the second primary partition without specifying a file system:
Next, we need to confirm the creation of the main partitions:

The result should be something like this (we see three main partitions /dev/sda1 /dev/sda2 /dev/sda3):
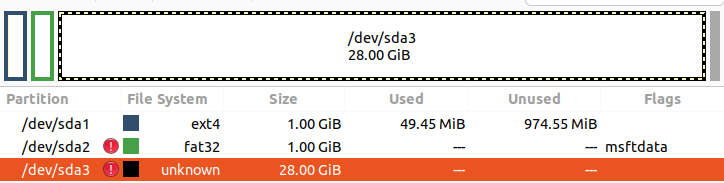
!!!Your sections may be named differently, an example is shown here. And also the size of the disk space will differ from the above
CREATING A LUKS SECTION
At this point, we will make an encrypted partition from the second main partition /dev/sda2, which, in turn, will be divided into subsections / - the root directory and /home - the home directory (information about the directory hierarchy of the Linux file system is in the “Reference Information” section ”, this topic can be studied in more detail on the resource from the “Sources” section).
To do this, go to the terminal again (I recommend running the sudo su command in order to immediately work with root rights - superuser rights). We need to create a LUKS partition, i.e. encrypted partition /dev/sda2. The cryptsetup utility that we will use will make it easier to encrypt a Linux partition using the dm-crypt module. We use the operations of this utility luksFormat and luksOpen.
sudo cryptsetup luksFormat /dev/sda3 - creates an encrypted partition/dev/sda3. After the question Are you sure? Enter in uppercase YES. You will be prompted for a key phrase: enter, confirm, remember.
sudo cryptsetup luksOpen /dev/sda3 box - connect the virtual device (you will need the key created in the previous step) box to /dev/sda3. Where box is the name of your choice.
Inside the LUKS partition we create a physical volume, an LVM volume group and two logical volumes. The first logical volume will be mounted as /, and the second - /home. We break it down in such a way that during further OS reinstallations there is no need to erase all user information.
The / - root partition is the main one in our system. All system files will be located here, and other partitions will be connected to it. This is where we will install all our programs and updates. If you take 50 Gigabytes for this partition, you won’t go wrong.
The /home section is for our files. Our user files and documents will be here. There shouldn't be enough space here, so we take everything that's left. In this case, 70 Gigabytes are allocated to /, everything else is /home.
sudo pvcreate /dev/mapper/box - create a physical volume on the virtual device box located on the third main partition /dev/sda3 for further creation of a vg - volume group in it.
sudo vgcreate vgbox /dev/mapper/box - create a volume group called vgbox in /dev/mapper/box.
sudo lvcreate -n lvboxroot -L 70g vgbox- create in the volume groupvgboxa logical volumelvboxrootin which our root directory will be located (/) with a size of 70GB.
sudo lvcreate -n lvboxhome -l 100%FREE vgbox - create a logical volume lvboxhome in the volume group vgbox, in which our user files will be located( /home).
INSTALLING THE SYSTEM
Before proceeding directly to installing the system, we need to assign mount points to our boot primary partition and the logical drives from the second primary partition, and also specify their file system format. Mount points are assigned so that in the next step we can mount these disks to our main system, i.e. roughly speaking, so that we can see them in the system and use them in the future.
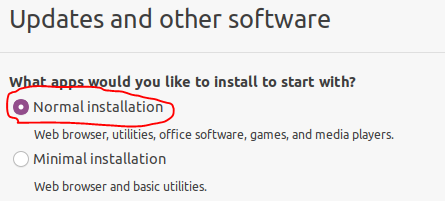
To start installing the OS, we need to open the graphical installer (the shortcut is on the desktop). The next step is to select the language and keyboard layout. Then we get to the installation selection and, in this example, select “Normal installation”, which will install not only the OS, but also a web browser, useful utilities, office software, games and media players.
Next, select “Somesing else” so that we can again get into the disk layout and select the appropriate mount points and file systems for our virtual volumes.

We get to the disk layout. Next, we change the partitions by double-clicking on them, selecting the file system and mount point. We need to assign:
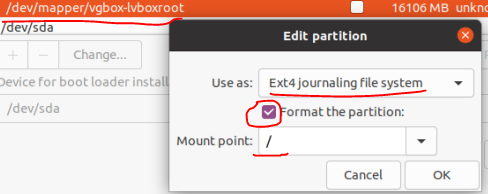
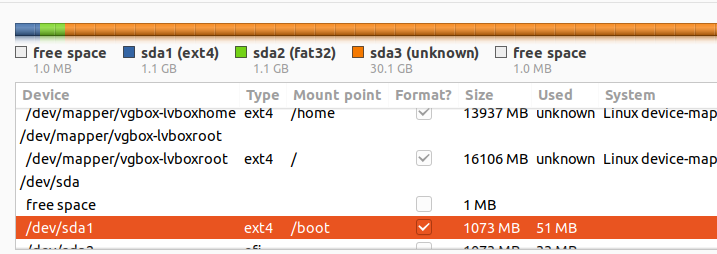
- mount point / to /dev/mapper/vgbox-lvboxroot (our virtual disk with the root directory) with ext4 format;
- mount point /hometo /dev/mapper/vgbox-lvboxhome (virtual disk with user data) with ext4 format;
- mount point /bootto /dev/sda1 (boot partition) with ext4 format;
- efimount point to /dev/sda2 with fat32 format.
Below is an example where the partition table shows our logical volumes and boot partition.
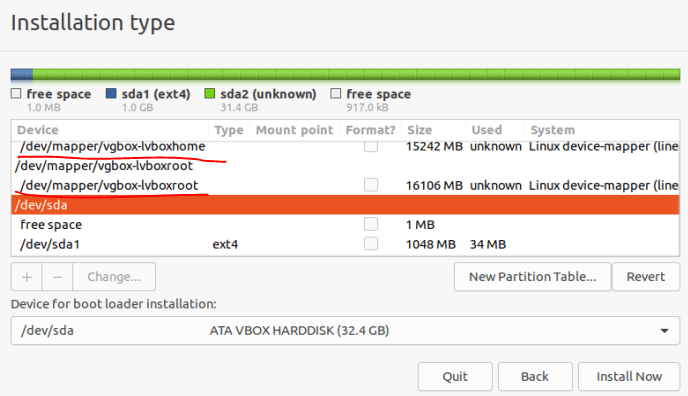
Also, an example of setting the mount point and file system format for /dev/mapper/vgbox-lvboxroot (root directory) is given below.
In this example, the resulting table looks like this:
In the field with the disk name /dev/sda (the disk name may be different) - select our entire hard drive. To start the installation, click “Install now”. Next, you need to select a location, enter personal data and passwords and start the installation.
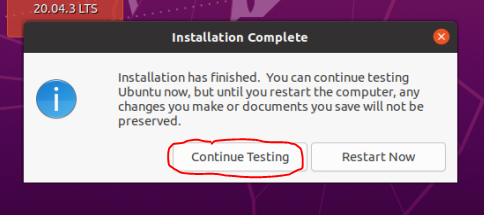
ATTENTION!!! After installation, we do not reboot the equipment (the system will ask for this), but go back to the terminal to mount partitions into the installed OS.
MOUNTING PARTITIONS
At this point we will mount partitions, as well as system folders, into the root system. In order for us to be able to use our previously created partitions, we need to mount the appropriate devices in the appropriate places /mnt.
sudo mount /dev/mapper/vgbox-lvboxroot /mnt - mounts the root directory to /mnt.
sudo mount /dev/mapper/vgbox-lvboxhome /mnt/home- mounts the home directory to /mnt/home.
sudo mount /dev/sda1 /mnt/boot- mounts the boot partition /dev/sda1 to /mnt/boot.
sudo mount --bind /dev /mnt/dev - remounts the /dev directory to /mnt/dev.
Then we take the following steps:
- sudo chroot /mnt - we run this program to change the root directory, we do this to access file systems such as proc, sysfs, devpts (see the “Reference Information” section). These file systems must be accessible from the chroot environment for the main programs to function properly;
- mount -t proc proc /proc - mount the device file proc with the file system proc to the root partition /proc, which contains files with process information that is used by the kernel to provide system status information;
- mount -t sysfs sys /sys - mount the device filesyswith the sysfs file system to the root partition /sys which contains data directly about the system. Here you can find out information about the kernel, drivers and devices. With the sysfs file system, you can set various kernel settings at runtime;
- mount -t devpts devpts /dev/pts - mount the device file devpts with the file system devpts to the root partition /dev/pts, which works with pseudo-terminals PTY/tty (more details can be found at the link in the “Sources” section).
COMPLETING THE INSTALLATION
At this point we must give information to the system boot about the encrypted partition. To do this, we need to find the UUID of our encrypted partition (/dev/sda2). UUID is a universally unique identifier for a hard disk partition. The UUID itself must be copied.
sudo blkid /dev/sda3 - with this command we will display the UUID on the screen and copy it.
Next, you need to create a file named /etc/crypttab, in which we will place information about the encrypted volume.
box (the name of our LUKS container) UUID=<identifier of the block device that contains the encrypted data> none luks (password option),retry=1,lvm=vgbox (name of our LVM group)
It should look something like the example below:

We run the following command:
update-initramfs -k all -c - with this command we write new startup rules in the initrd file, which is located in /boot, so that the system recognizes the encrypted partition and asks for a passphrase before starting work.
Reboot the system. After the reboot, you will be asked for the passphrase that was specified when creating the LUKS partition.
CONCLUSIONS
In this article, we looked at how to install the Ubuntu22.04 operating system on a fully encrypted volume and split this volume into logical subpartitions for the root and home directories.
REFERENCE INFORMATION
MBR(MASTER BOOT RECORD)
The Master Boot Record - MBR is located at the beginning of the disk space. Information about the placement of partitions on a hard drive is stored in the partition table, which is part of the master boot record (MBR). A partition can be either primary or extended. The first sector of each primary partition contains the boot sector, which is responsible for loading the OS from this partition. Information about which partition will be used to boot the operating system is also recorded in the master boot record. The MBR allocates 64 bytes for the partition table. Each entry takes 16 bytes. Thus, a total of no more than 4 partitions can be created on the hard drive. To overcome the limited maximum number of partitions, the extended partition was invented. An extended partition is very different from other types of partitions. It does not describe a partition, but a certain space where logical drives are located. MBR uses 32-bit addressing, so this legacy structure can only work with disks that do not exceed 2 TB. Partition information is stored in only one place - the MBR. If the master boot record is damaged, the disk will become unreadable. How the system boots when using an MBR disk structure: Self-test is performed after power on -> Then the BIOS detects the video card -> The BIOS start screen is displayed -> The RAM memory test begins -> Connected devices are being configured -> The boot device is detected. Once the BIOS detects the boot device, it reads the first sector where the MBR is located. The MBR checks the partition table and loads the boot sector into RAM. In the boot sector, the bootloader is first launched, which already initiates the OS boot process.
GPT(GUID PARTITION TABLE)
According to Wikipedia, GPT is a standard format for laying out partition tables on a physical hard drive. It is part of the Unified Extensible Firmware Interface (UEFI), a standard proposed by Intel to replace BIOS. Thus, GUID Partition Table is a new generation of disk partitions, replacing the outdated MBR. GUID stands for Globally Unique Identifier. A GPT disk consists of three parts:
- primary partition table. This contains the MBR security partition, which still stores the master boot record for the Legacy BIOS, the GPT header, and the partition table that the system needs to boot information and access logical partitions;
- regular data sections. This is the physical location where your data and logical files are stored;
- backup partition table. An area for a GPT disk that stores backup information for the GPT header table and partitions. Used in case of loss or corruption of the primary table.
LUKS (FROM LINUX UNIFIED KEY SETUP)
According to Wikipedia, a disk encryption format specification originally intended for use in operating systems based on the Linux kernel. The primary goal of the technology was to provide a user-friendly, standardized way to manage decryption keys. To perform Linux disk encryption, the dm-crypt kernel module is used. This module allows you to create a virtual block device in the /dev/mapper directory with encryption transparent to the file system and the user. In fact, all data is located on an encrypted physical partition. If a user tries to write data to a virtual device, it is encrypted on the fly and written to disk; when reading from a virtual device, the reverse operation is performed - the data is decrypted from the physical disk and transmitted in clear text through the virtual disk to the user.
LUKS section structure:
- header LUKS;
- key content storage KM1 - KM8;
- encrypted data.
The LUKS header, together with the contents of the KM key section, represents all the necessary information to access the encrypted partition. If the header or content sections of the keys are lost, it becomes impossible to access the encrypted data. You can learn more about this topic on the resources losst.ru, wikipedia.org.
COMMANDS FOR WORKING WITH BLOCK DEVICES
- lsblk - Show information about the hard drive;
- df -h - Shows free space on mounted partitions;
- fdisk -l - Shows information about the disk, partitions and file system;
- du -sh - Displays unallocated space on mounted partitions in MB, GB, TB;
- findmnt - Displays all mount points;
- mount /dev/sdb1 /mnt - Mounts partition 1 of the sdb disk to /mnt;
- pvcreate /dev/sda1 - mark the disk that will be used for LVM;
- vgcreate [options] <group name> - create a disk group;
- lvcreate [options] <volume group name> - creation of a logical volume.
TYPES OF FILE SYSTEMS FOR LINUX
- Ext2, Ext3, Ext4 or Extended Filesystem – standard file system. Contains the maximum number of functions and is the most stable due to rare changes in the code base. Starting with ext3, the system uses a logging feature. Today, a version of ext4 is present in all Linux distributions;
- JFS or Journaled File System was developed by IBM as an alternative to ext file systems. Now it is used where high stability and minimal resource consumption are required (primarily in multiprocessor computers). The log stores only metadata, which allows you to restore old versions of files after failures;
- ReiserFS was also developed as an alternative to ext3, supporting Linux only. Dynamic block sizing allows you to pack multiple small files into a single block, which prevents fragmentation and improves handling of small files. The disadvantage is the risk of data loss during a power outage;
- XFSis designed for large files and supports disks up to 2 terabytes. The advantage of the system is the high speed of working with large files, delayed allocation of space, expansion of partitions on the fly, and small size of service information. Disadvantages include the inability to reduce the size, the difficulty of data recovery and the risk of losing files during a power outage;
- Btrfsor B-Tree File System is easy to administer, has high fault tolerance and performance. Used as the default file system in OpenSUSE and SUSE Linux.
FILE SYSTEM FOLDER HIERARCHY
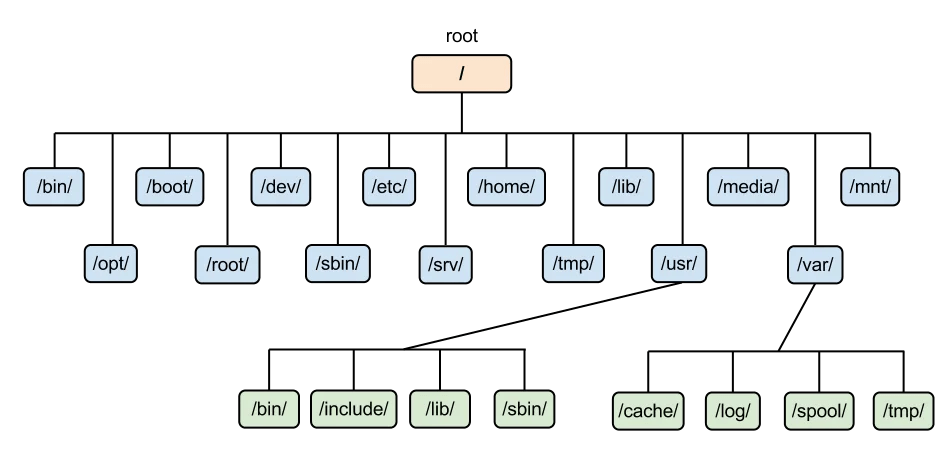
Image source: ServerSpace website
SPECIAL FILE SYSTEMS
The Linux kernel uses special file systems to provide user and program access to its settings and information. Most often you will encounter these options:
- tmpfs allows you to place any user files in the computer's RAM. Simply create a block device of the desired size, then connect it to a folder, and you can write files to RAM;
- procfs(proc) - by default mounted in the proc folder and contains all information about the processes running in the system, as well as the kernel itself;
- sysfs - with this file system you can set various kernel settings at runtime;
- devpts - provides access to pseudo terminals (PTY).
USEFUL LINKS
- Creating a bootable USB drive with Ubuntu
- Master Boot Record (MBR)
- GUID Partition Table (GPT)
- MBR and GPT Structures
- Comparison of GPT and MBR Partition Structures
- Linux Directory Hierarchy
- Linux File System Types
- LUKS Encryption
- LUKS Encryption Forum
- LUKS Disk Encryption in Linux
- Mounting Disks in Linux
- Chroot Command
- Linux File System Structure and Directory Hierarchy
- Pseudoterminals
Also read:
